The Grovestead
  •  Blog
  •  Events
  •  Publications
    • Durable Trades
    • Audio Recordings
    • The Grovestead Newsletter
  •  Gather & Grow
  •  About Us
The Grovestead
The Grovestead
  •  Blog
  •  Events
  •  Publications
    • Durable Trades
    • Audio Recordings
    • The Grovestead Newsletter
  •  Gather & Grow
  •  About Us
  •  Blog
  •  Events
    • Farm Camp
    • Workshops
    • Internships
  •  Publications
    • Durable Trades
    • The Grovestead Newsletter
  •  Farm Stand
  •  About Us
  • Tutorial

Winter-Proof Chicken Waterer

  • November 13, 2019
  • 3 comments
  • 446 views
  • Rory

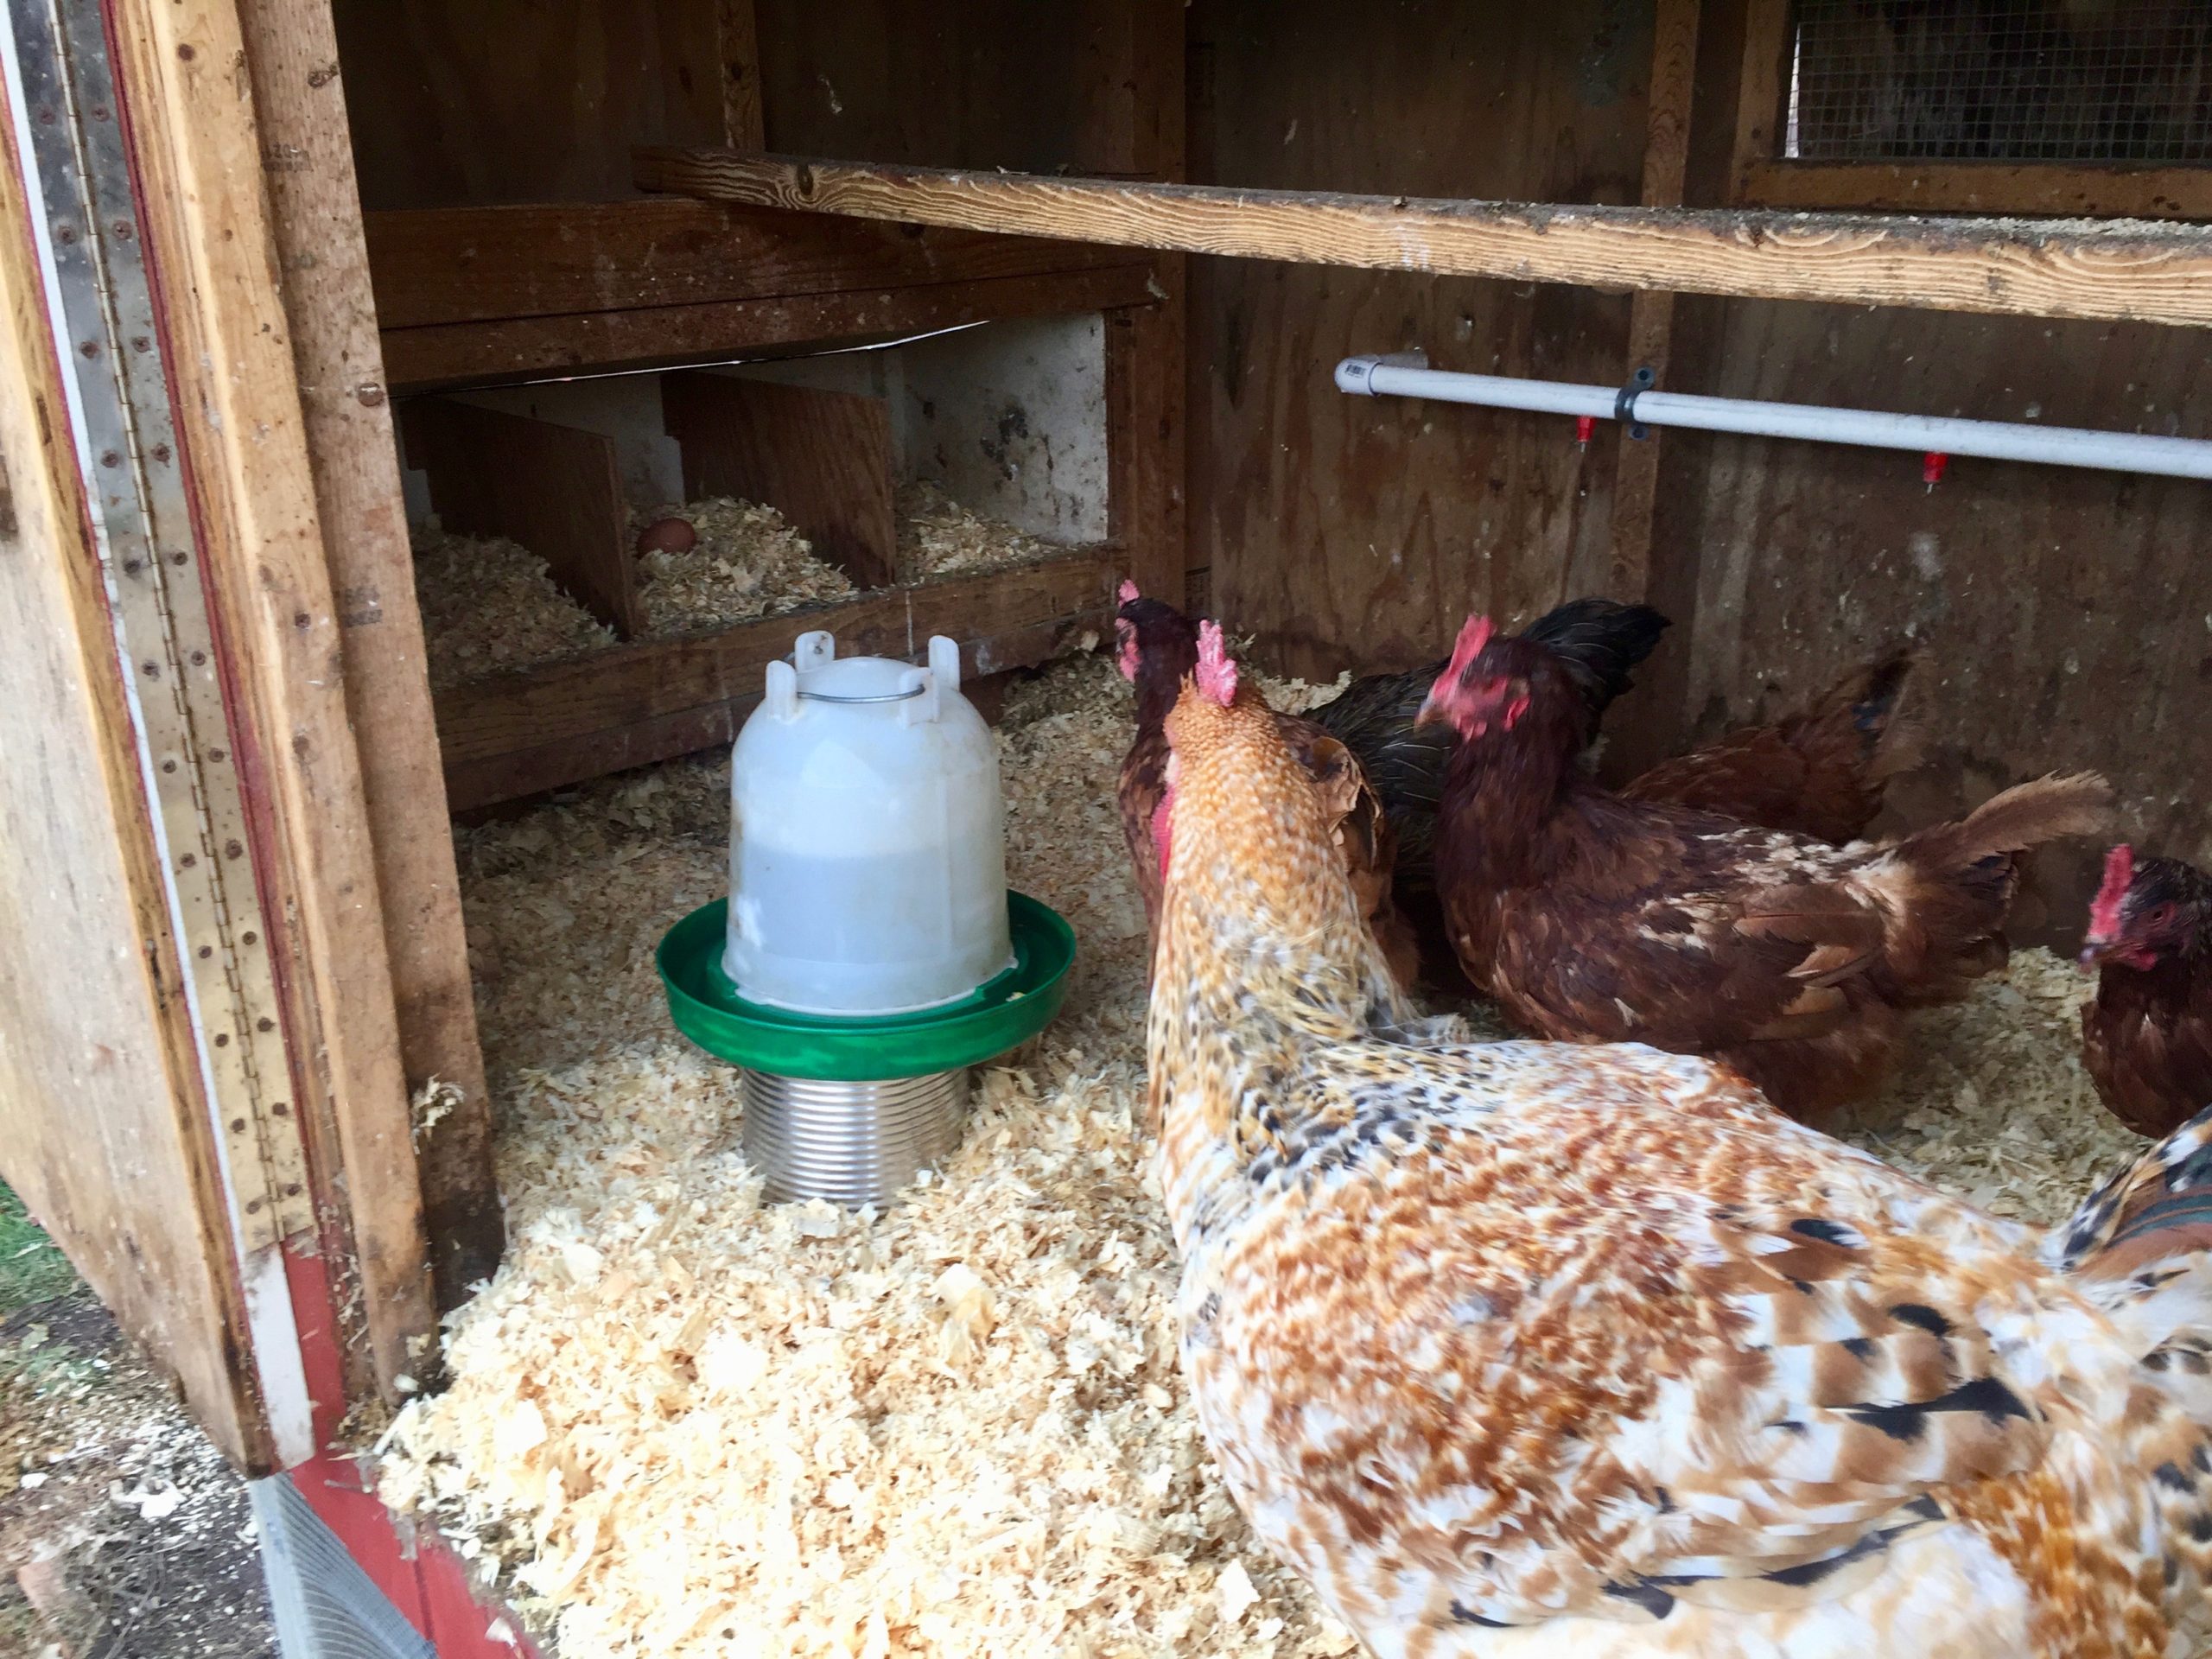
As soon as the temps drop below freezing, we Minnesota farmers break out the winter gear. My least favorite contraption is the chicken waterer. In the summer, I hook a hose up to drip waterers and never have to think about it all summer. In the winter, I switch to a regular gravity-fed bucket. But it turns to a bucket of ice within a few hours if I don’t keep it heated.

Every year I hunt for a better solution. I’ve tried every DIY project out there, but nothing works better than this simple design I came up with a few years ago. It’s also dirt cheap.
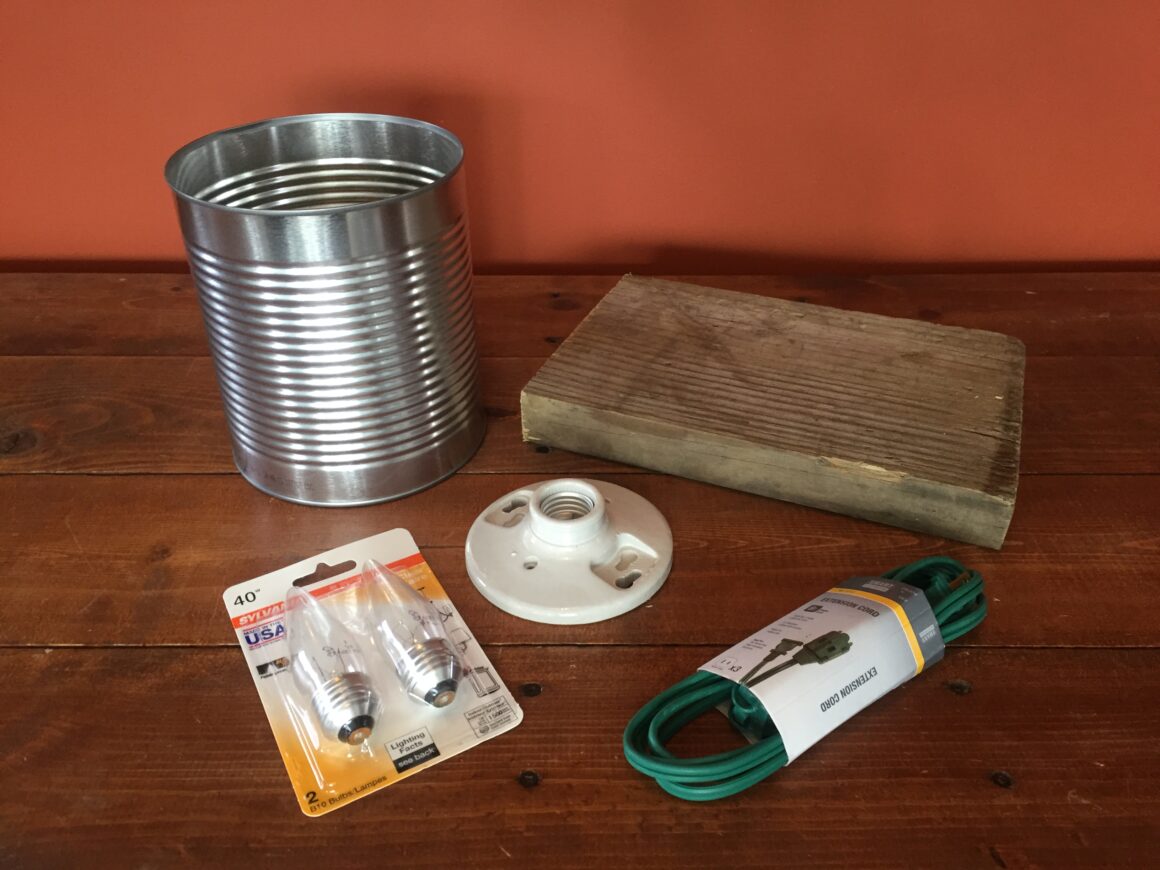
You’ll need:

  • #10 tin can (one end open)
  • Extension cord – $1.35
  • Light bulb fixture – $1.79
  • 25W to 40W Light bulb – $1
  • Scrap wood

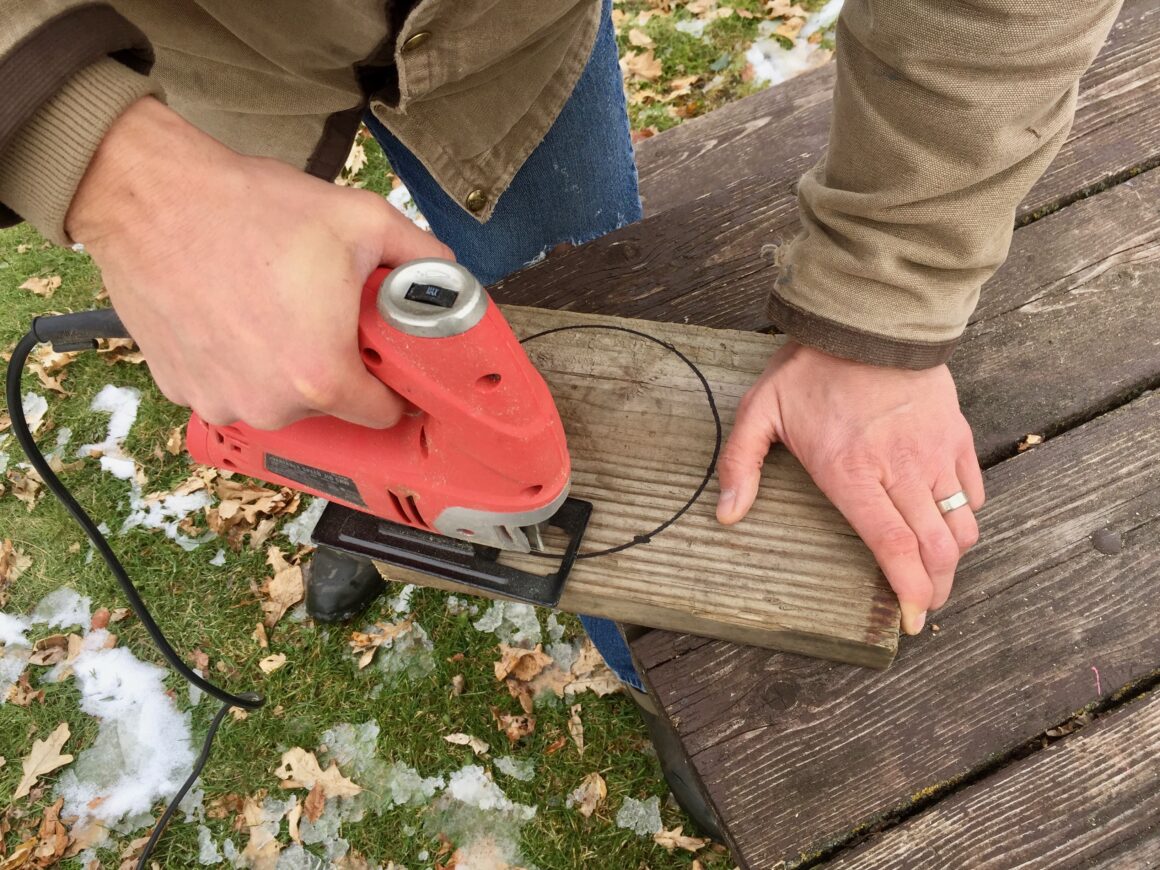
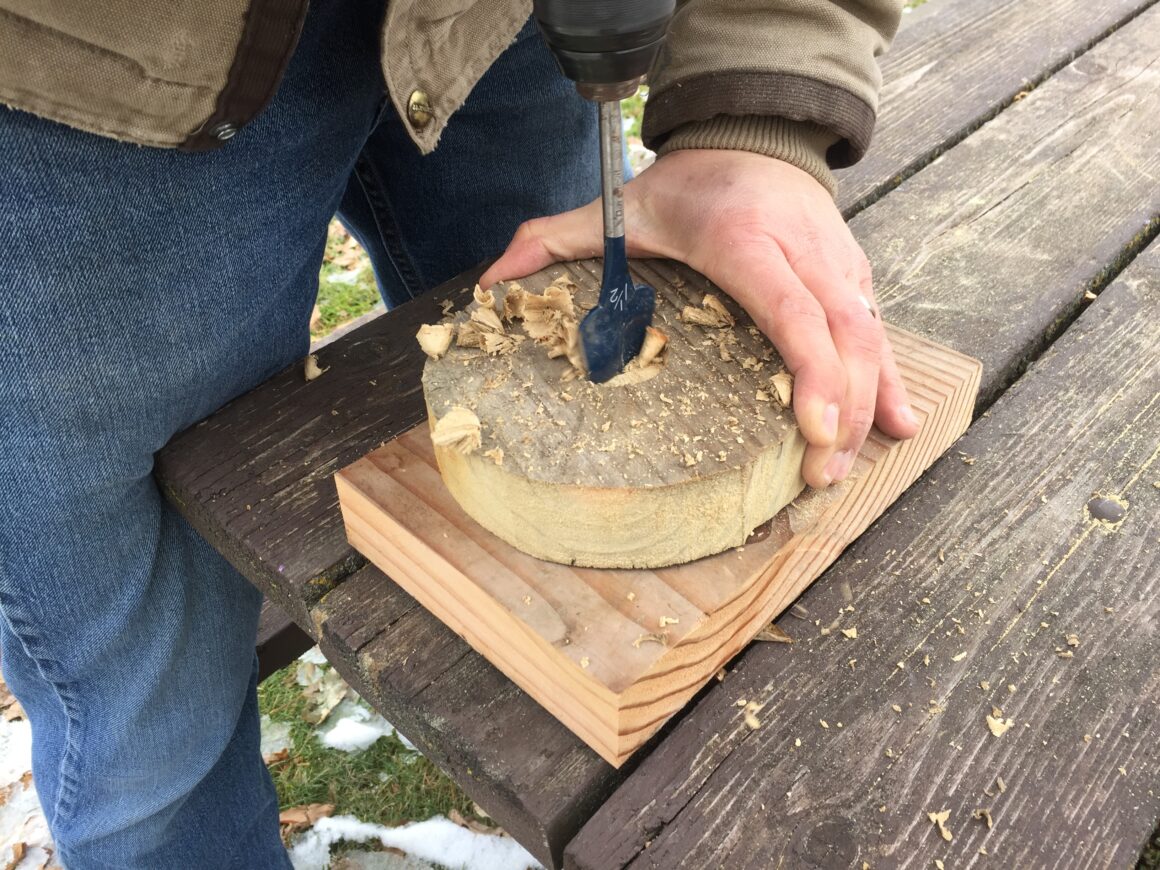
Step 1: Cut out wooden base

Trace around the #10 can on a piece of wood.

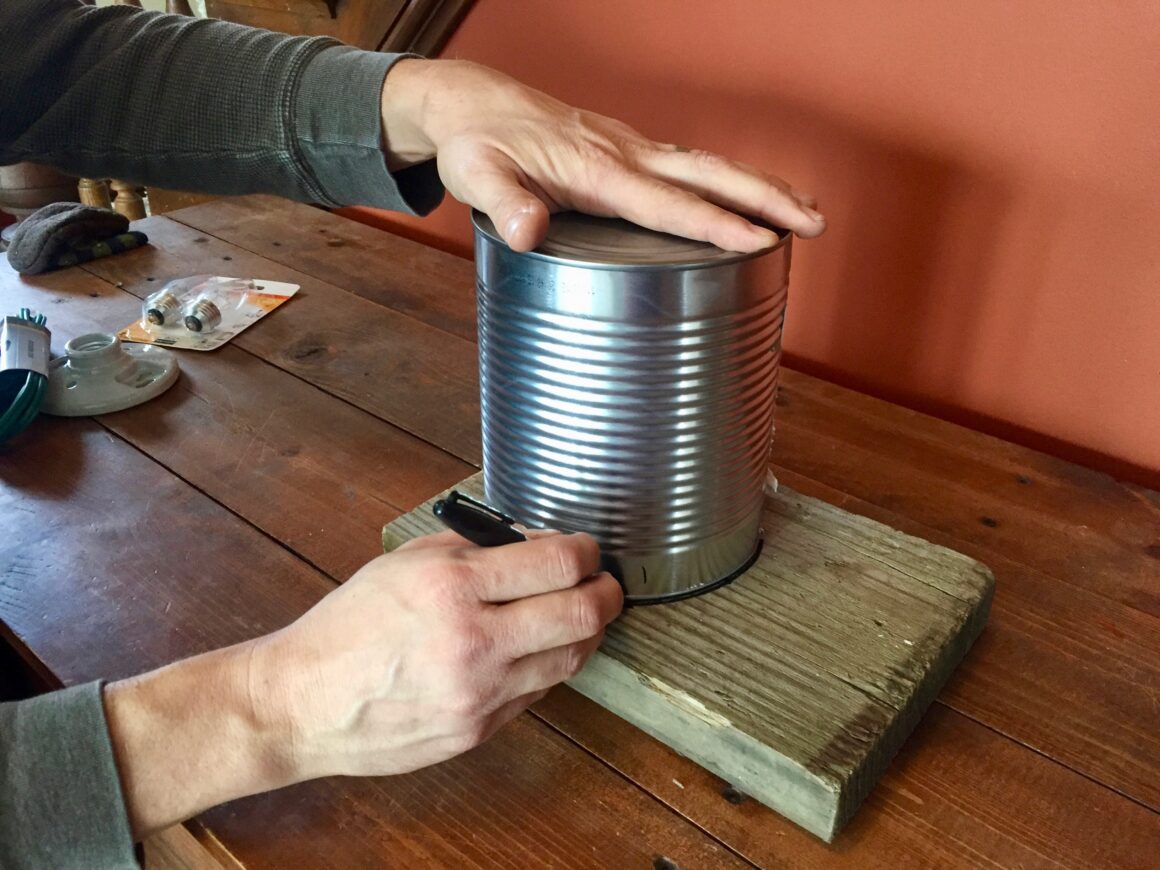
Use a jigsaw to cut out. Make sure to cut inside the line by about 1/8″. The can has to fit over the wood.

Drill a 1″ to 2″ hole in the center of the base.

Step 2: Wire light fixture

DISCLAIMER: Be sure to follow state electrical codes. Improper wiring can cause fires. If you are uncomfortable wiring a circuit yourself, find someone to help you.

Cut off the female end of the extension cord and remove wire insulation at the ends.

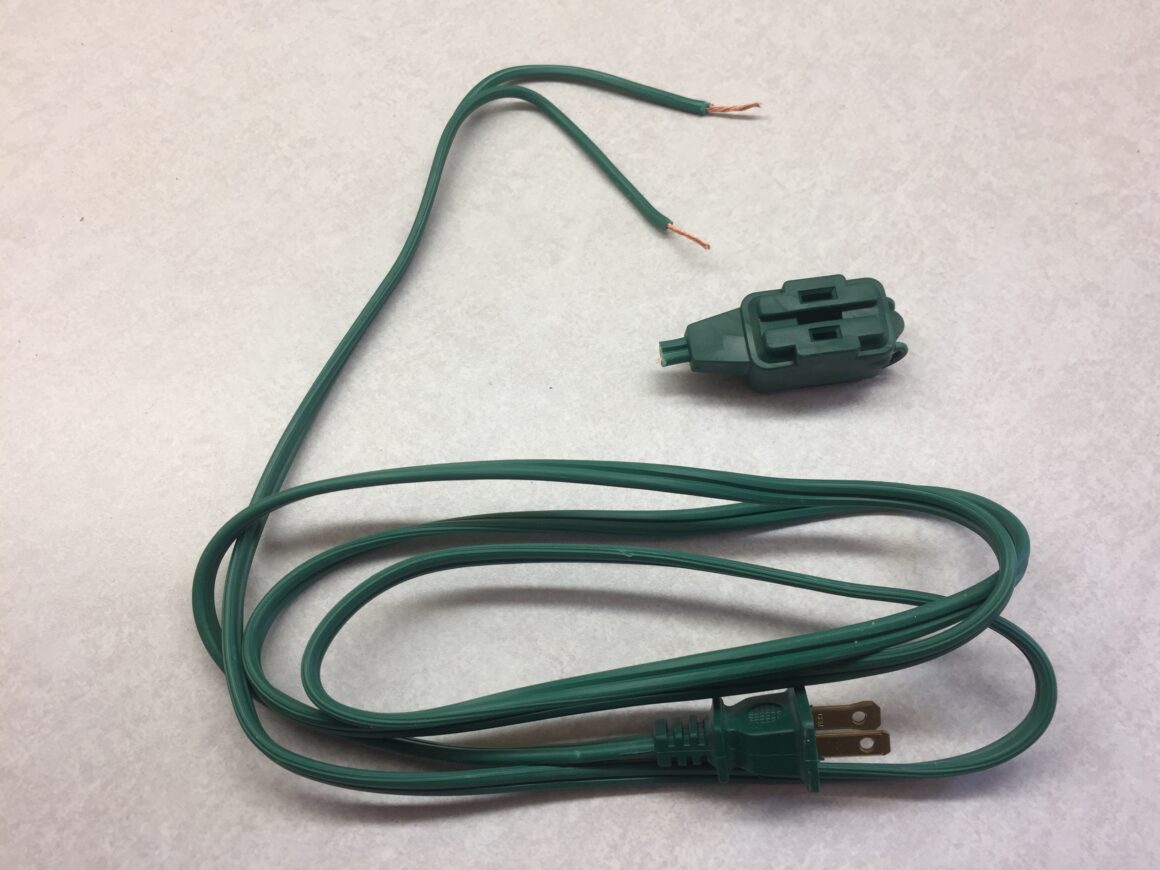
Connect the wire ends to the fixture.

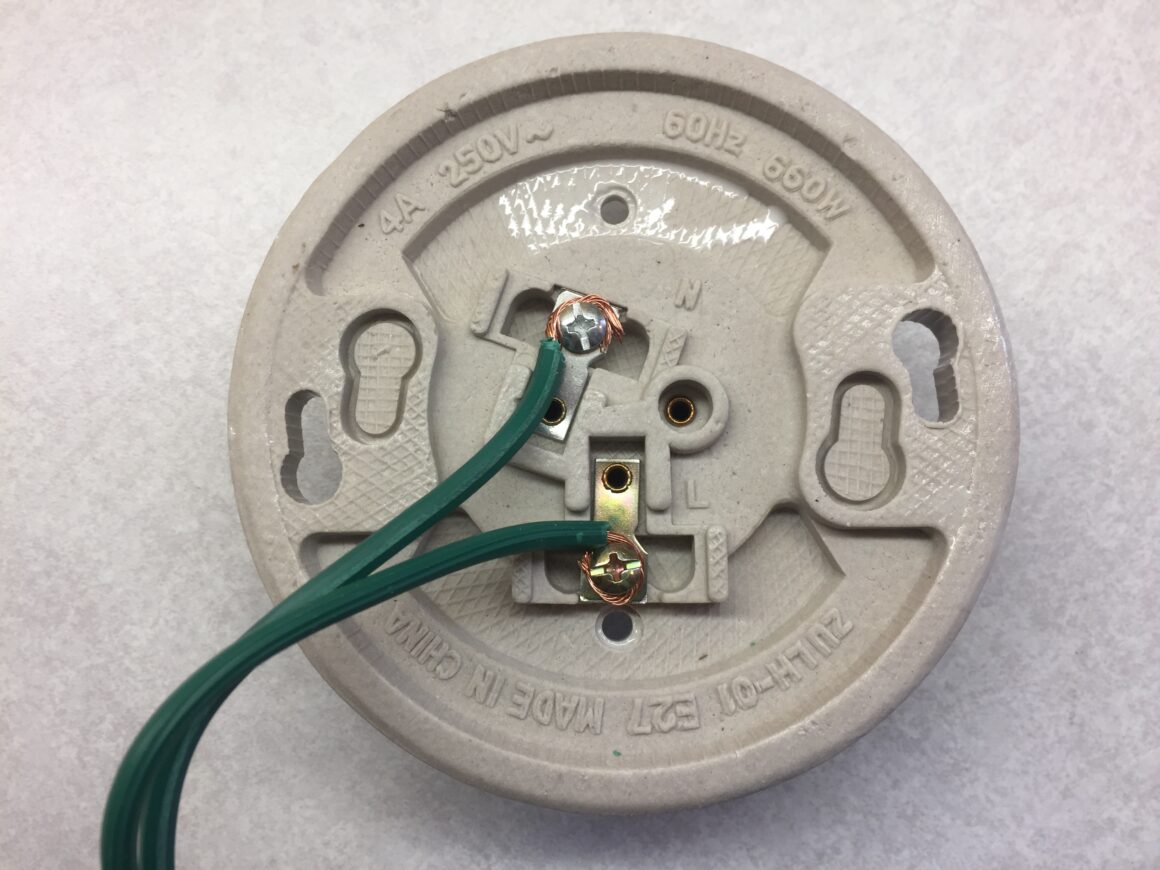
Test the connection by plugging it in.

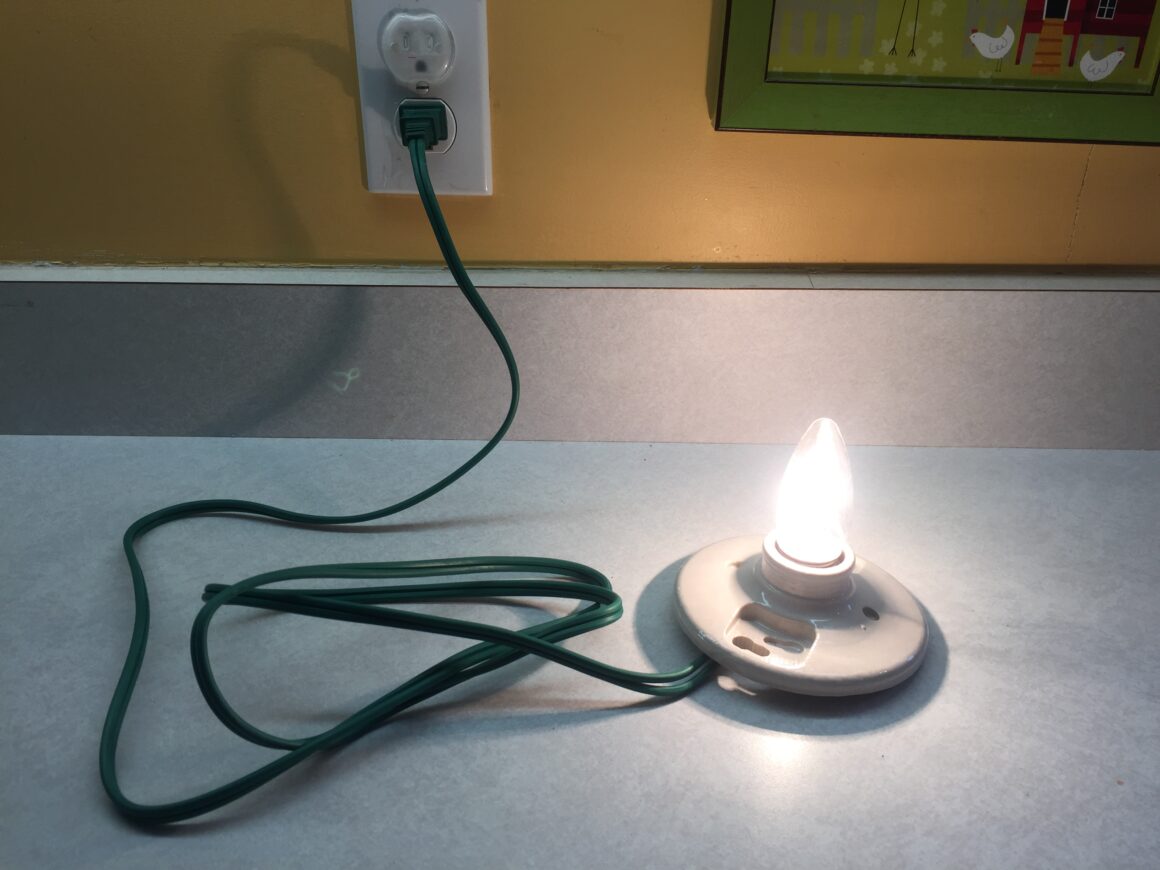
Step 3: Put it all together

Slide the extension coord through the hole in the wooden base and fasten the fixture to the base.

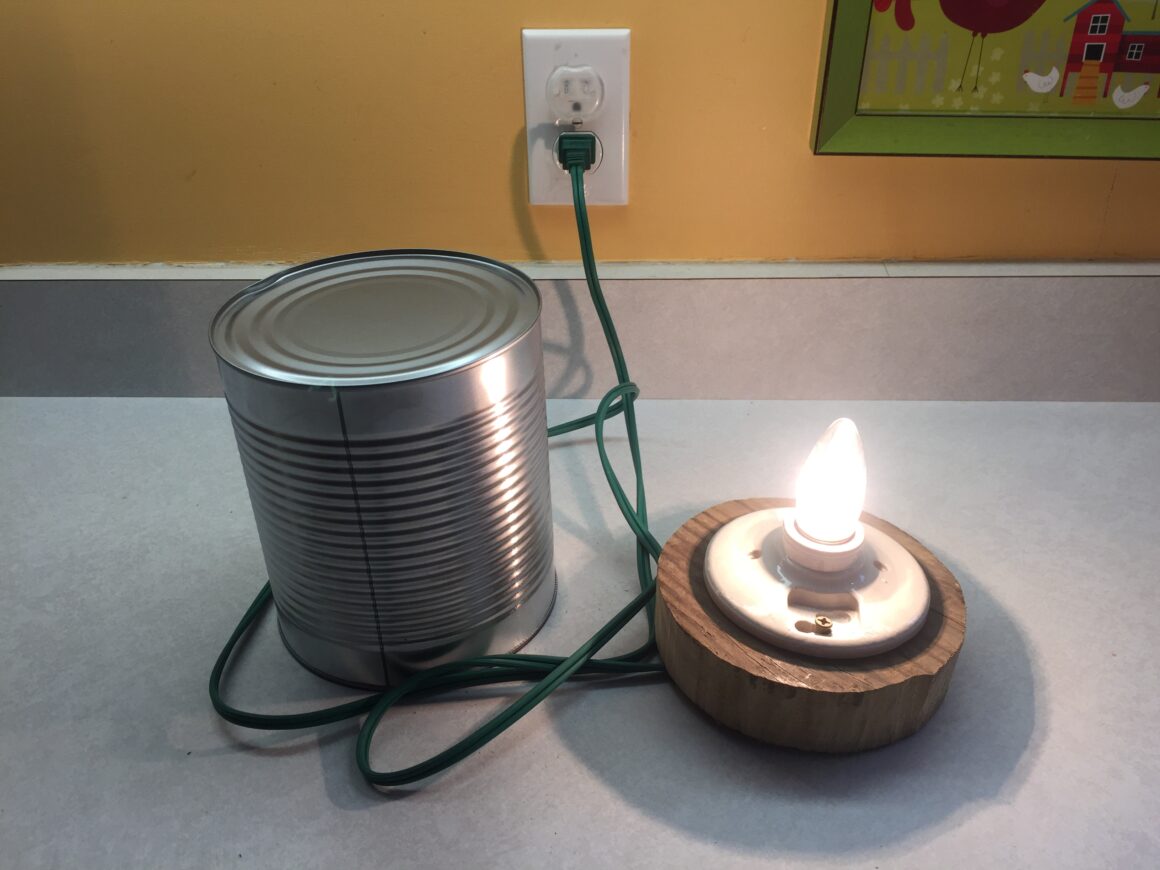
Slide the #10 can over the base, closed side up. If the fit is not snug, use screws to hold in place.

You should feel warmth instantly when plugged in.

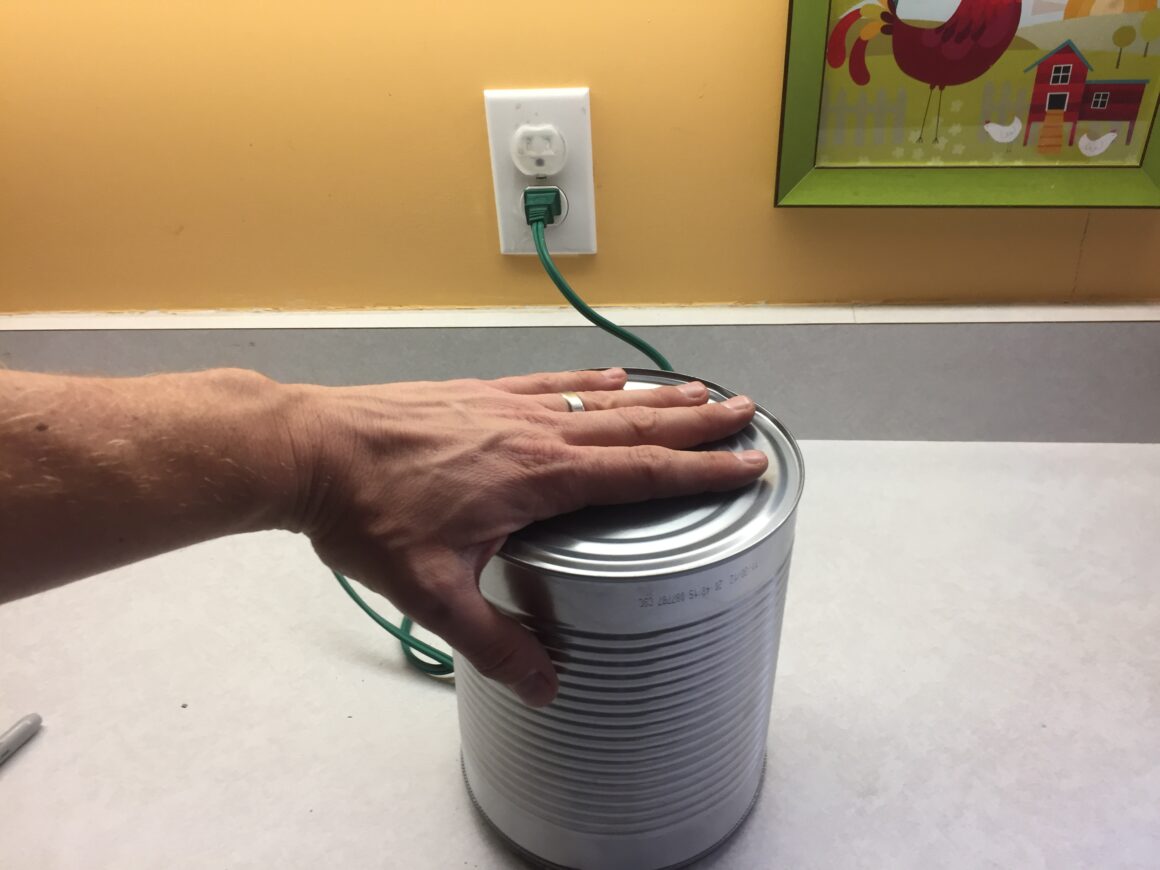
You’re all done! Set the base on a level floor and push bedding around it. Then plug in to an electric source and set the chicken waterer on top.

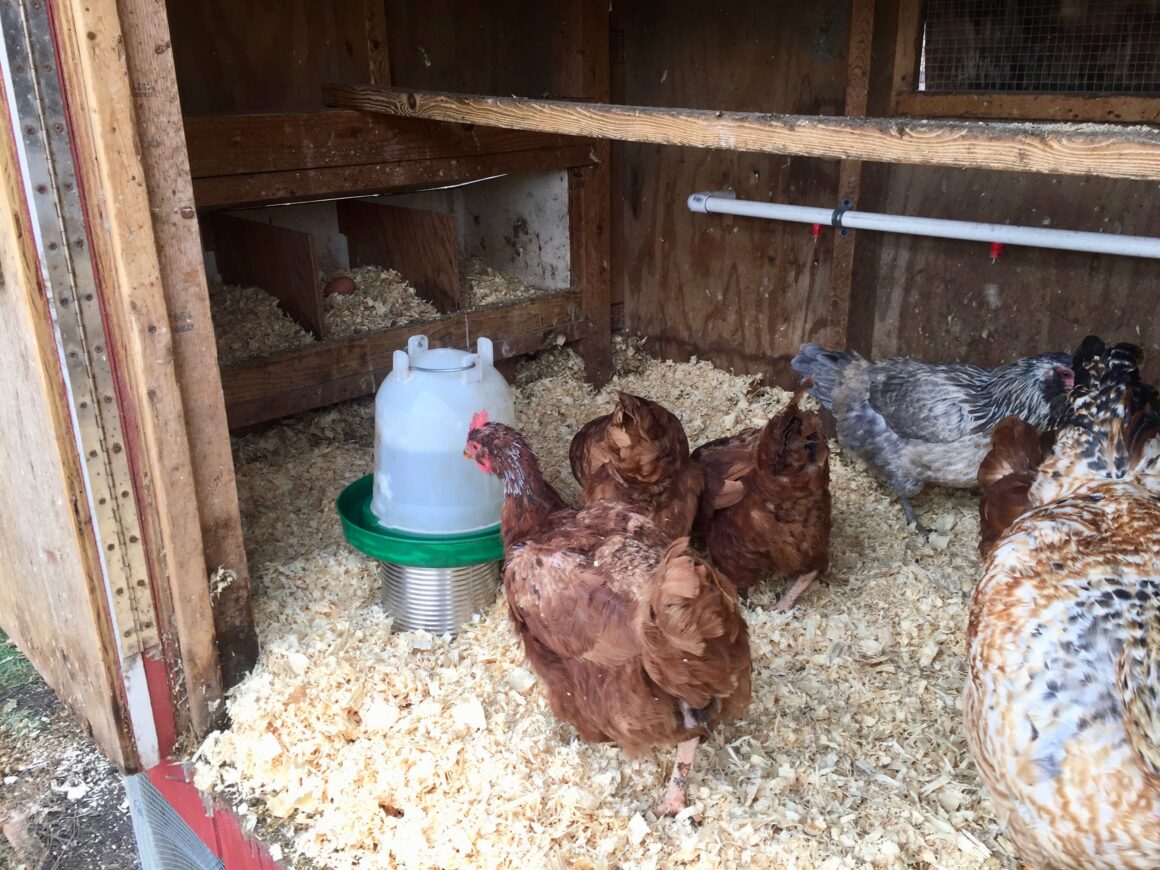
This setup works great down to -10°F. If needed, you can always increase the heat with a higher watt lightbulb.

Also, I installed a dimmer switch on my coop’s electric source so I can better control the amount of heat and not waste electricity.

4
0
2
Total
6
Shares
4
2
0
Avatar photo
Rory

Rory Groves moved his family from the city to the country several years ago to begin the journey towards a more durable way of life. Rory and his wife Becca now reside in southern Minnesota where they farm, raise livestock, host workshops, and homeschool their six children. He is the author of Durable Trades: Family-Centered Economies That Have Stood the Test of Time.

Tags
  • Chickens

Durable Trades is Now Available!

Our book about historical, family-centered professions is now on sale!

DETAILS & PURCHASE


Receive our Print Newsletter!

We publish a free quarterly newsletter to encourage Christian families and cover articles about farming, family, and faith.

DETAILS & SIGN-UP

You May Also Like
View Post
  • Family
  • Tutorial

DIY Christmas Gifts You Can Make for (or With) Your Kids!

  • December 11, 2020
  • Rory
View Post
  • Farming
  • Tutorial

The Farm Calendar

  • December 11, 2019
  • Rory
View Post
  • Farming
  • Tutorial

Managed Intensive Rotational Grazing for Sheep

  • December 27, 2016
  • Rory
View Post
  • Tutorial

Building a Top Bar Hive

  • May 23, 2016
  • Rory
View Post
  • Tutorial

Queening the hives

  • June 3, 2015
  • Rory
View Post
  • Tutorial

Evaporating sap and making maple syrup

  • April 9, 2015
  • Rory
View Post
  • Tutorial

How to tap a tree

  • March 29, 2015
  • Rory
View Post
  • Tutorial

Getting started with Maple Sugaring

  • March 12, 2015
  • Rory
3 comments
  1. Pingback: The Farm Calendar – The Grovestead
  2. Doug says:
    March 3, 2021 at 9:05 am

    One thing you forgot to mention is “don’t use an LED bulb”, they save money by producing only light and no heat, it should be an “old fashioned” incandescent bulb.

    Reply
    1. Avatar photo Rory says:
      March 3, 2021 at 11:22 am

      Very good point doug!

      Reply

Leave a Reply Cancel reply

Your email address will not be published. Required fields are marked *

Recent Posts
  • A Very Photogenic Winter
    • February 27, 2023
    • 98 views
  • Working Together
    • February 20, 2023
    • 188 views
  • How Much to Grow?
    • January 14, 2023
    • 616 views
Popular Posts
  • Where’s the Beef? It’s time to build our own supply chains.
    • April 25, 2020
    • 23.5K views
  • Managed Intensive Rotational Grazing for Sheep
    • December 27, 2016
    • 14K views
  • Boiling maple sap over home-built evaporator
    How to Build an Evaporator (from stuff laying around)
    • April 12, 2014
    • 11.4K views
Mailing List

Be notified of events and goings on at the Grovestead!

Contact
The Grovestead
  •  Blog
  •  Events
  •  Publications
  •  Gather & Grow
  •  About Us
Copyright © 2022 by The Grovestead. All Rights Reserved.

Input your search keywords and press Enter.